Great news from E3TEAM
We announced in advance last week that E3TEAM will release a great news for all ps3 user.
Here is our official claim:
1: E3TEAM will release all PS3 game free in public.
* It allow any 3.55CFW play all the new game without dongle.
* Just like the free eboot released by E3TEAM before.
2: E3TEAM will release the new key free in public.
* User can decrypt the new game by himself in few seconds .
* Please note all the release will be free with NO pay.
E3TEAM are building a full new system to release those free gift.
* We expect user can join this sytem to get what they want after 1-2 month.
* We will release more news about this system later.
* (PS: all is for downgradable console )
Following is our free eboot for 2 new game, password is (ilovee3)
Splinter Cell Trilogy HD BLES01146 - http://www.mediafire.com/?zmnqnr7ze9hz1hg
Batman Arkham City BLUS30538 (it is 1.04 update) -http://www.mediafire.com/?c3ytwwsq97r9t5w
Monday 30 July 2012
Saturday 28 July 2012
Tutorial How To Run Backups On DEX 3.6+
I take credential from MD Krie for his tutorial.
Tools diperlukan :
1->ps3gen.zip
2->psn_package_npdrm.rar
3->PS3 Game Updater 1.41.rar
4->PkgView_1.3.rar
untuk tools :
no 1 : http://www.4shared.net/download/3M6kpeGIWeg8Kk2MsU2AtE/ps3gen.html
no 2-4 : http://file7file.com/u/found-updpkg+cex2dex+7z/
Preparing the usb hdd:
1. Sambungkan external HDD pada PS3
2. Pergi ke debug setting pada PS3 DEX anda
3. Pergi ke BD Access pilih "BD Emulator (USB)"
4. Pergi ke transfer rate option pilih "HDD Native"
5. Pergi ke Boot Mode pilih "Release Mode"
6. Pergi ke "Format Emulator BD HDD" untuk format external HDD
Preparing the BD Emu Disc:
1. Sambung external HDD dengan pc anda
2. Klik buka pada psgen.exe
3. Isikan ruangan :
1. Sambung external HDD dengan pc anda
2. Klik buka pada psgen.exe
3. Isikan ruangan :
Title ID = bcusxxxx ..
Copyright Holder = SCE
Producer Name = SCE
Tandakan trophy
4. Klik pada setup game
5. Klik pada fail -> import -> pilih param.sfo game pilihan anda
6. Klik tab content information file, drag n drop fail dari PS3_GAME tanpa direktori(Folder)
7. Klik pada fail yang latar belakang kelabu, klik kanan dan tekan delete
8. Klik ok
9. Klik tab directory -> Klik PS3_GAME -> klik TROPDIR di dalam directory tersebut (Pada Ps3gen).
-> Bukak folder asal game tersebut -> klik pada PS3_GAME -> klik TROPDIR -> drag n drop folder yang berada dalam TROPDIR tersebut ke TROPDIR Pada Ps3gen diatas.
-> Klik PS3_GAME -> klik USRDIR di dalam directory tersebut (Pada Ps3gen)
-> Bukak folder asal game tersebut -> klik pada PS3_GAME -> klik USRDIR -> drag n drop folder dan fail-fail yang berada dalam USRDIR tersebut ke USRDIR Pada Ps3gen diatas.
10.Klik pada file -> Save project -> klik exit
11.Klik kanan psgen.exe, run as admin
12.Klik pada file -> open project -> klik build
13.Klik pada tab "for bd emulator HDD" - klik salah satu image,image0 hingga image3 (hanya untuk 4 game)
14.Klik build dan tunggu sehingga selesai
Preparing the update:
1. Anda perlu mendapatkan Update PKG terbaru untuk game pilihan anda ( jika game pilihan anda tiada update PKG, game tersebut tidak boleh dimain)
2. Drag n drop Update PKG game pilihan anda tersebut pada PkgView.exe
3. Klik kanan pada folder yang berapa dalam PkgView.exe tersebut dan extract to source folder
4. Keluarkan folder BLESXXX, Contoh: BLESXXX dari dalam folder UP1018-BLESXXXX_00-ARKHAMCITY0PATCH-A0104-V0100-PE ke dir (same tempat dengan psn_package_npdrm.exe yang di ekstrak)
5. Mengekstrak psn_package_npdrm.exe ini ke dir
6. Buat txt ini ke dir dan isi dengan.:
Content-ID = EP0001-BCUS98295_00-0000111122223333
K_licensee = 0x00000000000000000000000000000000
DRM_Type = Free
Content_Type = GameData
PackageType = DiscGamePatch
PackageVersion = 01.21
Namakan semula .Txt fail ke "package.conf"
Dimana BCUS98295 diatas masukan ID game pilihan anda dan Packageversion diatas masukan version bape Update PKG yang anda download tadi.
7. Klik pada cmd dengan command: package.conf psn_package_npdrm.exe BCUS98295
-> Ini akan mewujudkan DEX update PKG untuk game pilihan anda
8. Masukan update PKG tersebut pada usb, dan cucuk pada PS3 DEX anda
9. Klik install pada PS3
Exclusive! Tutorial : Convert CEX ke DEX Fast Method! (GUIDE FOR NOR CONSOLE)
....:::::: CEX TO DEX TOOLS ::::::....
*Burn iso kat cd atau guna USB flash drive
- Petitboot tools (extract ke USB flash drive)= http://www.mediafire.com/?ny2tj269h1tjrf3
*PKG yang perlu install kat PS3 cuma "dump_flash.pkg","setup_flash_for_otheros.pkg","install_otheros.pkg","boot_otheros.pkg","reboot.pkg" segala vflash pkg tak perlu install.
*semua PKG tools akan ada bunyi bip bila run
- CFW OtherOS++ with SS patch = http://www.ps3devwiki.com/wiki/OtherOS%2B%2B
*Data dalam PS3 akan hilang masa untuk install CFW ni. Aku suggest install 1/8 HDD reservered.
- CEX2DEX apps = http://www.mediafire.com/?nqwe94hy9lah1bk
- Flowrebuilder = http://www.mediafire.com/?2i1yay2h0qn2sd7
- meltdrpwn pre compiled (Extract folder ke root USB flash drive) = http://www.mediafire.com/?c9k31hajmrcpmz4
- HxD Hex Editor = http://download.cnet.com/HxD-Hex-Editor/3000-2352-10891068.html?part=dl-HxDHexEdi&subj=uo&tag=button
- meltdrpwn pre compiled (Extract folder ke root USB flash drive) = http://www.mediafire.com/?c9k31hajmrcpmz4
- HxD Hex Editor = http://download.cnet.com/HxD-Hex-Editor/3000-2352-10891068.html?part=dl-HxDHexEdi&subj=uo&tag=button
....:::::: PUP FILES ::::::....
- 4.20 DEX = http://ps3scenefiles.com/file.php?id=857
- 4.20 DEX Downgrader = http://ps3scenefiles.com/file.php?id=855
- DEX to CEX Switcher PUP's = http://ps3scenefiles.com/file.php?id=856
- Rogero DEX 3.55 = http://ps3scenefiles.com/file.php?id=858
- 1st p&p 3.55 dex (Tapi aku suggest guna rogero je )= http://ps3scenefiles.com/file.php?id=859
Download tutorial in pdf = http://www.mediafire.com/?8bk29965qxrn376
******************************************************
Chapter 1 - Install Petitboot
1. Install CFW OtherOS++
2. Masuk recovery mode dan pilih "Restore PS3 System"
3. Run "setup_flash_for_otheros.pkg"
4. Reboot PS3 (power off PS3 then power on)
5. Pastikan "dtbImage.ps3.bin" ada dalam USB flash drive,run "install_otheros.pkg"
6. Run "reboot.pkg"
7. PS3 akan boot petitboot sekarang
*sambung keyboard n mouse kat PS3.
*semua command perlu hit "Enter"
8. Pilih "Exit to shell"
9. Pastikan fail "create_hdd_region.sh" dalam USB flash drive. Connect USB flash drive ke PS3
10.Taip "cd /tmp/petitboot/mnt/"
11. Taip : "ls"
12. Cek kalau USB flash drive signed dengan "sda1" atau "sde1" etc etc... Biasanya "sda1"
13. Taip : "cd /tmp/petitboot/mnt/sda1/"
14. Taip : "./create_hdd_region.sh"
15. Reboot PS3 (hold power button until off,power on PS3)
17. Run "reboot.pkg"
18. Sekarang dalam petitboot. Pilih option untuk install Red Ribbon Linux (dengan OtherOS++,bukan Asbestos)
19. Untuk "username;password", guna "ps3;ps3"
20. Selesai install,reboot PS3.
21. Connect USB flash drive ke PS3
22. Run "dump_flash.pkg" (black skrin kat tv,tunggu beberape minit akan ade 3 bip,return ke XMB)
23. Cabut USB flash drive dr PS3 then connect kat PC
24. Launch Flowrebuilder , pilih "EXTRACT a Byte reversed NOR dump or an interleaved and unscrambled NAND dump." Untuk input masukkan flash.bin dr USB flash drive.
25. Masuk ke output folder,masuk ke folder "asecure_loader"
26. Copy "Metldr" n paste ke folder "metldrpwn" yg dah extract ke root USB flash drive. (x:\metldrpwn)
28. Launch Red Ribbon Linux
29. Copy and paste folder "metldrpwn" dr USB flash drive ke : /home/ps3
30. Bukak terminal, taip : "cd metldrpwn"
31. Taip "sudo chmod +x ./run.sh"
32. Taip "sudo ./run.sh"
32. Copy "dump_eid0.bin" ke USB flash drive
33. Buka file "dump_eid0.bin" dengan HxD Hex Editor
34. Highlight dan copy 3 line pertama :

35. Create file baru dan paste 3 line td. Screenshot :

36. Save as "dump" . takde extension.
37. Launch CEX2DEX apps. Untuk input : "flash.bin" dari dump_flash.pkg. Make sure (16mb). Untuk metldr input : "dump" yang created dr HxD apps td. Klik "CEX -> DEX". Save output as "DEX.bin"
38. Copy "DEX.bin" ke root USB flash drive.
2. Masuk recovery mode dan pilih "Restore PS3 System"
3. Run "setup_flash_for_otheros.pkg"
4. Reboot PS3 (power off PS3 then power on)
5. Pastikan "dtbImage.ps3.bin" ada dalam USB flash drive,run "install_otheros.pkg"
6. Run "reboot.pkg"
7. PS3 akan boot petitboot sekarang
*sambung keyboard n mouse kat PS3.
*semua command perlu hit "Enter"
8. Pilih "Exit to shell"
9. Pastikan fail "create_hdd_region.sh" dalam USB flash drive. Connect USB flash drive ke PS3
10.Taip "cd /tmp/petitboot/mnt/"
11. Taip : "ls"
12. Cek kalau USB flash drive signed dengan "sda1" atau "sde1" etc etc... Biasanya "sda1"
13. Taip : "cd /tmp/petitboot/mnt/sda1/"
14. Taip : "./create_hdd_region.sh"
15. Reboot PS3 (hold power button until off,power on PS3)
Chapter 2 - Install Red Ribbon Linux
16. Masukkan Red Ribbon linux cd (boleh guna USB flash drive)17. Run "reboot.pkg"
18. Sekarang dalam petitboot. Pilih option untuk install Red Ribbon Linux (dengan OtherOS++,bukan Asbestos)
19. Untuk "username;password", guna "ps3;ps3"
20. Selesai install,reboot PS3.
Chapter 3 - Dump flash PS3/Dump PS3 BIOS
22. Run "dump_flash.pkg" (black skrin kat tv,tunggu beberape minit akan ade 3 bip,return ke XMB)
23. Cabut USB flash drive dr PS3 then connect kat PC
24. Launch Flowrebuilder , pilih "EXTRACT a Byte reversed NOR dump or an interleaved and unscrambled NAND dump." Untuk input masukkan flash.bin dr USB flash drive.
25. Masuk ke output folder,masuk ke folder "asecure_loader"
26. Copy "Metldr" n paste ke folder "metldrpwn" yg dah extract ke root USB flash drive. (x:\metldrpwn)
Chapter 4 - Metldrpwn/dumping EID Key
27. Connect USB flash drive td ke PS3.28. Launch Red Ribbon Linux
29. Copy and paste folder "metldrpwn" dr USB flash drive ke : /home/ps3
30. Bukak terminal, taip : "cd metldrpwn"
31. Taip "sudo chmod +x ./run.sh"
32. Taip "sudo ./run.sh"
32. Copy "dump_eid0.bin" ke USB flash drive
Chapter 5 - Convert CEX ke DEX
33. Buka file "dump_eid0.bin" dengan HxD Hex Editor
34. Highlight dan copy 3 line pertama :

35. Create file baru dan paste 3 line td. Screenshot :

36. Save as "dump" . takde extension.
37. Launch CEX2DEX apps. Untuk input : "flash.bin" dari dump_flash.pkg. Make sure (16mb). Untuk metldr input : "dump" yang created dr HxD apps td. Klik "CEX -> DEX". Save output as "DEX.bin"
38. Copy "DEX.bin" ke root USB flash drive.
Chapter 6 - Flashing DEX dump
40. Exit to shell.
41. Taip "cd /tmp/petitboot/mnt/sda1/"
42. Taip "dd if=DEX.bin of=/dev/ps3nflasha bs=1024" . Ambil masa dalam 5-8 minit
43. Reboot PS3
44. Install 3.55 DEX PUP via XMB/Recovery Mode.
Enjoy DEX machine !
************************ NOTES #1 ***********************
Untuk step 44, boleh guna Rogero 3.55 DEX with P&P (Act mcm normal CFW,boleh main backup games kat DEX 3.55 :) )
Here's a DEX 3.55 CFW with both Peek/Poke and Downgrader features built-in:
- it can be used as a normal 3.55DEX FW during the CEX to DEX conversion.
- it can be used as a 3.55DEX CFW that can run Backups.
- it can be used for Downgrading back to 3.55DEX from 3.55+ DEX FW versions.
MD5: 81e0c358411d75491a11f5b9386dc174
No more need to use 2 different 3.55-DEX PUPs.
Cheers
Rogero
************************ NOTES #2 ***********************
In case kalau korang tak phm Chapter 5 - Convert CEX ke DEX , just send kat aku original dump (16mb) dengan eid0.bin (256kb)
************************ NOTES #3 ***********************
Untuk revert ke CEX :
Download DEX to CEX Switcher PUP's . Ade 2 PUP. PUP yg 1st untuk DEX 3.55.purpose,untuk convert ke CEX blk. PUP ke2 utk CEX 3.55 untuk convert ke DEX
*Cuma install kat firmware 3.55 DEX/CEX sahaja
Untuk downgrade 4.20 DEX ke 3.55 DEX :
Download 4.20 DEX Downgrader .Install downgrader ni sekali je.Then install 3.55 DEX
Tutorial : Full format PS3 HDD on PC
Connect PS3 HDD ke PC
Buka command prompt (run as admin)
Taip "diskpart" hit ENTER
Taip "list disk" hit ENTER
Taip "select disk X" . "X" tu drive number dalam list disk. hit ENTER
Taip "clean" hit ENTER.
Taip "create partition primary" hit ENTER
Taip "select partition 1" hit ENTER
Taip "active" hit ENTER
Taip "assign" hit ENTER. Depend nak quick format atau full format. Boleh skip.
Taip "exit" hit ENTER
Format PS3 HDD/USB mass storage ke FAT32 = http://www.mediafire.com/?vuasmcatpvph643
Tutorial : PSN untuk CFW 3.55
This outdated since Sony disable PSN
Baru ni Rebug team release new update, PSN access untuk CFW 3.55. Wlaupun untuk sementare,korang boleh enjoy PSN content credit to Rebug team :)
BTW bende ni belum perfect. Mungkin ade yang still tak dapat access PSN etc etc. Ade certain game yang perlukan update untuk connect ke PSN. Tanpa game update tu korang akan dapat error log in PSN. Compitable game still random. Jangan tanya aku or siape2 kat grup ni. Cube sendiri kat konsol korang n bg feedback kat sini game2 yg compitable untuk PSN ;)
Ade 2 version. Bagi user yang guna Rebug CFW dan non-Rebug CFW. Aku tak jamin kalau PS3 korang problem
--------------------------------------------------
Untuk Rebug CFW ; Rebug Update Package 0.7 (3.55.2)
- Semestinya korang dah pakai Rebug CFW 3.55.2
- Install Rebug_Update_Package.pkg kat XMB
- Run Rebug Update Package dalam kolum Games
- Ikot prompt kat skrin
- PS3 akan reboot
- Selesai reboot,korang boleh delete Rebug Update Package
Task untuk update ni :
- Update version spoofer ke 4.11
- PSN akses
- tambah reActPSN 2.0
Download - http://scmods.com/rebug/pkg/Rebug_Update_Package_0.7_3.55.2.pkg
Pastikan MD5 CHECKSUM - bc2b153a7675107530656563ac6df3c3
--------------------------------------------------
Untuk non-Rebug CFW ; PSN v4.11 Spoofer
- Install 4.11_Version_Spoofer_2.2_355.pkg
- Run dan install
- Lepas run,untuk install file:
tekan L1+X untuk INSTALL 4.11 Version Spoof file ke dalam PS3
- Untuk activate/deactivate:
tekan L1+X untuk ACTIVATE/DEACTIVATE (System akan reboot)
- Untuk uninstall version spoofer file:
tekan L1+O untuk UNINSTALL,completely (deactivate spoofer, remove spoof file dari dev_flash dan reboot)
Task untuk spoofer ni :
- Update version spoofer ke 4.11
- PSN akses
- tambah reActPSN 2.0
Download - http://scmods.com/rebug/pkg/4.11_Version_Spoofer_2.2_355.pkg
Pastikan MD5 CHECKSUM - 7180a4ca1750071982524125aa75a6fc
*Untuk TB cfw aku tak pasti spoofer ni compitable ke tidak. Aku tak jamin kalau PS3 korang problem
--------------------------------------------------
Compitable untuk online gaming so far :
Dead Rising 2
Naruto ultimate ninja storm 2
Marvel ultimate alliance 2
Marvel vs capcom 3
Nba 2k11
Lara croft: guardian of light
Killzone 2
Crysis 2
Pro Evolution Soccer 11
Fifa 11
Fifa 12
Rage
Smackdown vs RAW 2011
Mortal Kombat
Gta IV
Ridge Racer 7
Battlefield 1943 (PSN)
Crash Bandicot (PSN)
Burnout Paradise + DLC (PSN)
Resident Evil Gold Edition
Army of Two the 40th day
Far Cry 2
2k11
Saints Row 2
Modern Warfare 2 (perlukan Elite Mossys patch blocker + update 1.12)
Mortal Kombat vs. DC Universe
Blur
WWE All Stars
White Knight Chronicles (1.01)
Uncharted 2
Red Dead Redemption
Virtua Tennis 4
Ninja Gaiden 2
Battlefield Bad Company 2
Rainbow Six Vegas 2
Bomberman Ultra
Castlevania Harmony of Despair
Soul Calibur 4
Tekken 6
BlazBlue Calamity Trigger
Assassin's Creed Brotherhood
Hardcops
Crash Commando
Daytona USA
Need For Speed Hot Pursuit
Demon's Souls
James bond007
portal 2
Tutorial : Validating E3 flash dump (NOR only)
Validating flash dump part yang paling penting masa downgrade.pastikan dapat dump yang 100% correct, valid, verified dumps.
Kalau takde dump yang bagus/invalid/bad dan rewriting ke flash,restoring process takkan jadi.bukan setakat tu,konsol mungkin akan permanent brick/permabrick!
NOTE : ni cara basic,mungkin kene cek lagi dengan yang pakar.
--------------------------------------------------
Once completed, bukak "bkpps3.swap" dengan HxD. pilih Statistics kat Analysis menu. mouse over blue graph bars dr 00 dan FF. nilai untuk valid flash dump :
00 = 18.71% - 29.01%
FF = 10.42% - 10.48%
rest = bawah 0.5%
"00 00 00 00 0F AC E0 FF 00 00 00 00 DE AD BE EF" (HEX) and asecure_loader
bukan
"00 00 00 00 AC 0F FF E0 00 00 00 00 AD DE EF BE" (HEX) and saceru_eoldare
NOTE : semua dump dari E3 dlm bytereversed condition (original)
Offset(h) 00 01 02 03 04 05 06 07 08 09 0A 0B 0C 0D 0E 0F
00FC0000 28 B4 4F D2 F9 3F BC 43 28 B4 4F D2 F9 3F BC 43
bootldr rosak ; sepatutnye mula dengan "00 00" bukan "28 B4"
Offset(h) 00 01 02 03 04 05 06 07 08 09 0A 0B 0C 0D 0E 0F
0000010 00 00 00 00 0F AC E0 FF 00 00 00 00 DE AD BE EF
Valid dump bila dah extract mesti ada fail/folder :
Kalau takde dump yang bagus/invalid/bad dan rewriting ke flash,restoring process takkan jadi.bukan setakat tu,konsol mungkin akan permanent brick/permabrick!
NOTE : ni cara basic,mungkin kene cek lagi dengan yang pakar.
--------------------------------------------------
1 - Analisis statistik
Launch Flowrebuilder kat pc. pilih option "Byte reverse and EXTRACT a NOR dump file." kat input drag/drop dump yang nk bytereversed.Once completed, bukak "bkpps3.swap" dengan HxD. pilih Statistics kat Analysis menu. mouse over blue graph bars dr 00 dan FF. nilai untuk valid flash dump :
00 = 18.71% - 29.01%
FF = 10.42% - 10.48%
rest = bawah 0.5%
2 - Bytereversed
Contoh :"00 00 00 00 0F AC E0 FF 00 00 00 00 DE AD BE EF" (HEX) and asecure_loader
bukan
"00 00 00 00 AC 0F FF E0 00 00 00 00 AD DE EF BE" (HEX) and saceru_eoldare
NOTE : semua dump dari E3 dlm bytereversed condition (original)
3 - Fail cacat
Contoh : bootldrOffset(h) 00 01 02 03 04 05 06 07 08 09 0A 0B 0C 0D 0E 0F
00FC0000 28 B4 4F D2 F9 3F BC 43 28 B4 4F D2 F9 3F BC 43
bootldr rosak ; sepatutnye mula dengan "00 00" bukan "28 B4"
4 - Magic header
kat offset 0x10 sepatutnya ade FACEOFF DEADBEEF value/magic headerOffset(h) 00 01 02 03 04 05 06 07 08 09 0A 0B 0C 0D 0E 0F
0000010 00 00 00 00 0F AC E0 FF 00 00 00 00 DE AD BE EF
5 - Dump content
Valid dump bila dah extract mesti ada fail/folder :
asecure_loader aka metldr
ros0 <-- content system information before update
ros1 <-- content current system information
bootloader_0
cCSD
eEID
cISD
trvk_prg0
trvk_prg1
trvk_pkg0
trvk_pkg1
cvtrm
6.1 - Cek Motherboard_Revision
Pergi ke offset 0x2F070. untuk cek IDPS/Target_ID table rujuk sini http://pastebin.com/DcfjB4eB
**Motherboard_Revisions // possible sku model (8th byte)
Contoh : (dump dari konsol zamil)
Offset(h) 00 01 02 03 04 05 06 07 08 09 0A 0B 0C 0D 0E 0F
0002F070 00 00 00 01 00 8A 00 09 10 00 61 F3 A6 08 76 12 .....Š....aó¦.v
Untuk cek Motherboard_Revisions rujuk byte ke-8 =09. kalau rujuk kat table (http://pastebin.com/DcfjB4eB) , value 09 ialah "0x09 = CECH20A / CECH20B (120GB/250GB Slim) - DYN-001"
Value 09 ade nilai untuk bootloader/metldr tersendiri. so boleh rujuk http://pastebin.com/DcfjB4eB untuk nilai bootloder/metldr.
**optional : cek Target_ID
**Known Target ID's (6th byte)
Contoh : (dump dari konsol zamil )
Offset(h) 00 01 02 03 04 05 06 07 08 09 0A 0B 0C 0D 0E 0F
0002F070 00 00 00 01 00 8A 00 09 10 00 61 F3 A6 08 76 12 .....Š....aó¦.v
Untuk cek Target ID rujuk byte ke-6 = 8A. kalau rujuk kat table (http://pastebin.com/DcfjB4eB) , value untuk 8A ialah "0x8A Retail South Asia CEX"
**optional : cek jenis harddrive
Point ke Offset 0xF20200, dekat text sebelah value akan tunjuk brand dan model harddrive
Contoh : (dump dari konsol zamil)
Offset(h) 00 01 02 03 04 05 06 07 08 09 0A 0B 0C 0D 0E 0F
00F20200 00 00 00 12 54 4F 53 48 49 42 41 20 4D 4B 31 32 ....TOSHIBA MK12
ros0 <-- content system information before update
ros1 <-- content current system information
bootloader_0
cCSD
eEID
cISD
trvk_prg0
trvk_prg1
trvk_pkg0
trvk_pkg1
cvtrm
6 - Cek saiz metldr+bootldr
Saiz metldr dan bootldr berbeza ikot Motherboard_Revision.6.1 - Cek Motherboard_Revision
Pergi ke offset 0x2F070. untuk cek IDPS/Target_ID table rujuk sini http://pastebin.com/DcfjB4eB
**Motherboard_Revisions // possible sku model (8th byte)
Contoh : (dump dari konsol zamil)
Offset(h) 00 01 02 03 04 05 06 07 08 09 0A 0B 0C 0D 0E 0F
0002F070 00 00 00 01 00 8A 00 09 10 00 61 F3 A6 08 76 12 .....Š....aó¦.v
Untuk cek Motherboard_Revisions rujuk byte ke-8 =09. kalau rujuk kat table (http://pastebin.com/DcfjB4eB) , value 09 ialah "0x09 = CECH20A / CECH20B (120GB/250GB Slim) - DYN-001"
Value 09 ade nilai untuk bootloader/metldr tersendiri. so boleh rujuk http://pastebin.com/DcfjB4eB untuk nilai bootloder/metldr.
**optional : cek Target_ID
**Known Target ID's (6th byte)
Contoh : (dump dari konsol zamil )
Offset(h) 00 01 02 03 04 05 06 07 08 09 0A 0B 0C 0D 0E 0F
0002F070 00 00 00 01 00 8A 00 09 10 00 61 F3 A6 08 76 12 .....Š....aó¦.v
Untuk cek Target ID rujuk byte ke-6 = 8A. kalau rujuk kat table (http://pastebin.com/DcfjB4eB) , value untuk 8A ialah "0x8A Retail South Asia CEX"
**optional : cek jenis harddrive
Point ke Offset 0xF20200, dekat text sebelah value akan tunjuk brand dan model harddrive
Contoh : (dump dari konsol zamil)
Offset(h) 00 01 02 03 04 05 06 07 08 09 0A 0B 0C 0D 0E 0F
00F20200 00 00 00 12 54 4F 53 48 49 42 41 20 4D 4B 31 32 ....TOSHIBA MK12
00F20210 35 35 47 53 58 20 48 20 20 20 20 20 20 20 20 20 55GSX H
00F20220 20 20 20 20 20 20 20 20 20 20 20 20 20 20 20 20
00F20230 20 20 20 20 20 20 20 38 39 52 4E 43 35 37 4A 54 89RNC57JT
Harddrive = TOSHIBA MK12 55GSX H 89RNC57JT :)
6.2 - Cek bootloader/metldr mengikut MOBO value.
Cek value bagi setiap MOBO value kat sini http://imageshack.us/f/819/capturewyx.png/
Contoh : (dump dari konsol zamil)
Dump dari konsol zamil ade MOBO value of 09.
dr table http://imageshack.us/f/819/capturewyx.png/ , bootloader/metldr value untuk MOBO = 09 ialah :
metldr --> 0x81E (NOR) = E8 90, 0x842 (NOR) = 0E 85 ,
bootloder --> 0xFC0002 (NOR) = 2F 13 , 0xFC0012 (NOR) = 2F 13 ,
saiz = 2F170
6.3 - cek/verify bootloader/metldr dalam dump
6.3.1 - verify metldr value dan saiz :
Drag and drop bkpps3.swap ke HxD.mouse over Search bar dan pilih Go to.
Dalam kotak Offset, isi "81E",tekan ok.ia akan tunjuk offset 0x81E dan value pada offset tersebut. value untuk offset 0x81E ialah E8 90.value ni jugak tunjukkan saiz metldr
Ulang langkah tadi dengan isikan Offset "842".value bagi Offset 0x842 ialah 0E 85
Sekarang compare metldr value dari dump dengan dari dalam table.kedua2 value adalah same :)
Tentukan saiz metldr yang mana value E8 90 dalam Offset 81E. untuk dapatkan nilai sebenar E8 90,convert dari hex ke decimal (http://www.binaryhexconverter.com/hex-to-decimal-converter) . jadi nilai sebenar bagi value E8 90 ialah 59536.
Sekarang bukak folder bkpps3.swap.ext/asecure_loader/metldr, right click pada metldr , kat situ saiz metldr ialah (59,536 bytes)
Bandingkan nilai yang sudah di-convert dengan saiz metldr :
(59,536 bytes) = 59536
6.3.2 - verify bootloader value dan saiz
Dalam HxD,point kepada Offset 0xFC0002,cek value dalam Offset tu = 2F 13
Lepastu point kepada Offset 0xFC0012,value Offset tu ialah 2F 13
NOTE = untuk bootloader, nilai dalam Offset tak mununjukkan saiz bootloader sebenar
Sekarang compare value yang dah dapat dengan table untuk bootloader.value kedua2nya sama :)
Tentukan saiz bootloader.dalam table bootloader,kat situ saiz bootloader ialah 2F170.
Convert 2F170 kepada decimal value : 192880
Sekarang bukak file bkpps3.swap.ext\bootloader_0, right click pada bootloader_0, valuenya ialah (192,880 bytes)
Banding nilai dari bootloader table dengan saiz bootloader_0 :
192880 = (192,880 bytes)
- IFI header
- asecure loader
**2 bende ni cume listed sekali sahaja untuk satu2 dump!
Untuk IFI header :
Bukak HxD, cari value "49 46 49 00 00 00 00 01 00 00 00 02 00 00 00 00"
Tekan butang Search,Find again.
"Can't find XXXXXXXXXXXXXXX" = OK <---- hex value ni cume listed sekali sahaja.
Untuk asecure loader ni adalah hex valuenya :
"61 73 65 63 75 72 65 5F 6C 6F 61 64 65 72 00 00"
Bukak HxD,cari hex value "61 73 65 63 75 72 65 5F 6C 6F 61 64 65 72 00 00"
Tekan butang Search,Find again
"Can't find XXXXXXXXXXXXXX" = OK <--- hex value listed sekali sahaja
00F20220 20 20 20 20 20 20 20 20 20 20 20 20 20 20 20 20
00F20230 20 20 20 20 20 20 20 38 39 52 4E 43 35 37 4A 54 89RNC57JT
Harddrive = TOSHIBA MK12 55GSX H 89RNC57JT :)
6.2 - Cek bootloader/metldr mengikut MOBO value.
Cek value bagi setiap MOBO value kat sini http://imageshack.us/f/819/capturewyx.png/
Contoh : (dump dari konsol zamil)
Dump dari konsol zamil ade MOBO value of 09.
dr table http://imageshack.us/f/819/capturewyx.png/ , bootloader/metldr value untuk MOBO = 09 ialah :
metldr --> 0x81E (NOR) = E8 90, 0x842 (NOR) = 0E 85 ,
bootloder --> 0xFC0002 (NOR) = 2F 13 , 0xFC0012 (NOR) = 2F 13 ,
saiz = 2F170
6.3 - cek/verify bootloader/metldr dalam dump
6.3.1 - verify metldr value dan saiz :
Drag and drop bkpps3.swap ke HxD.mouse over Search bar dan pilih Go to.
Dalam kotak Offset, isi "81E",tekan ok.ia akan tunjuk offset 0x81E dan value pada offset tersebut. value untuk offset 0x81E ialah E8 90.value ni jugak tunjukkan saiz metldr
Ulang langkah tadi dengan isikan Offset "842".value bagi Offset 0x842 ialah 0E 85
Sekarang compare metldr value dari dump dengan dari dalam table.kedua2 value adalah same :)
Tentukan saiz metldr yang mana value E8 90 dalam Offset 81E. untuk dapatkan nilai sebenar E8 90,convert dari hex ke decimal (http://www.binaryhexconverter.com/hex-to-decimal-converter) . jadi nilai sebenar bagi value E8 90 ialah 59536.
Sekarang bukak folder bkpps3.swap.ext/asecure_loader/metldr, right click pada metldr , kat situ saiz metldr ialah (59,536 bytes)
Bandingkan nilai yang sudah di-convert dengan saiz metldr :
(59,536 bytes) = 59536
6.3.2 - verify bootloader value dan saiz
Dalam HxD,point kepada Offset 0xFC0002,cek value dalam Offset tu = 2F 13
Lepastu point kepada Offset 0xFC0012,value Offset tu ialah 2F 13
NOTE = untuk bootloader, nilai dalam Offset tak mununjukkan saiz bootloader sebenar
Sekarang compare value yang dah dapat dengan table untuk bootloader.value kedua2nya sama :)
Tentukan saiz bootloader.dalam table bootloader,kat situ saiz bootloader ialah 2F170.
Convert 2F170 kepada decimal value : 192880
Sekarang bukak file bkpps3.swap.ext\bootloader_0, right click pada bootloader_0, valuenya ialah (192,880 bytes)
Banding nilai dari bootloader table dengan saiz bootloader_0 :
192880 = (192,880 bytes)
7 - Cek jika ada double header
Sesetengah value cume ade 1 je dalam satu2 dump. so skrg amek 2 unique 16bytes value :- IFI header
- asecure loader
**2 bende ni cume listed sekali sahaja untuk satu2 dump!
Untuk IFI header :
Bukak HxD, cari value "49 46 49 00 00 00 00 01 00 00 00 02 00 00 00 00"
Tekan butang Search,Find again.
"Can't find XXXXXXXXXXXXXXX" = OK <---- hex value ni cume listed sekali sahaja.
Untuk asecure loader ni adalah hex valuenya :
"61 73 65 63 75 72 65 5F 6C 6F 61 64 65 72 00 00"
Bukak HxD,cari hex value "61 73 65 63 75 72 65 5F 6C 6F 61 64 65 72 00 00"
Tekan butang Search,Find again
"Can't find XXXXXXXXXXXXXX" = OK <--- hex value listed sekali sahaja
--------------------------------------------------
Dump seems fine. sekarang selamat untuk proceed downgrade process
Cube verify guna dump dari konsol zamil = (0x09 = CECH20A / CECH20B (120GB/250GB Slim) - DYN-001)
Download = http://www.sendspace.com/file/misogo
Dump seems fine. sekarang selamat untuk proceed downgrade process
Cube verify guna dump dari konsol zamil = (0x09 = CECH20A / CECH20B (120GB/250GB Slim) - DYN-001)
Download = http://www.sendspace.com/file/misogo
Tutorial : Transfering PS3 game
Ade 2 cara :
-PC to external HDD
-FTP PC to PS3 (or vice versa)
--------------------------------------------------
1st method - PC to external HDD
Sebelum transfer ke ext hdd,make sure dah format ext tu ke fat32.kalau format pakai windows rasanya tak boleh since windows 7 dah takde format fat32 (cume ade exfat and ntfs) . dicadangkan guna ‘easeus partition manager’
Dah siap format ,buat 1 folder 'GAMES' kat root external hdd.then baru la transfer folder game kat dlm tu. contoh 'x:/GAMES/BLES10021'
Sebelum transfer,perlu diigtkan ade file2 dlm games tu yg >4gb as well fat32 tak support file transfer >4gb.tp tak semua game ade file >4gb.depend kat game la. search 'ps3splitter' kat google.download,install mcm biasa. bila dah launch,klik execute.pilih folder game td 'BLES10021'.ia akan automatik detect file >4gb n split file tu.prompt akan keluar bile dah siap split.
Baru la boleh connect ke ps3.connect,bukak multiman n refresh.list game akan keluar
--------------------------------------------------
2nd method - FTP PC to PS3 (or vice versa)
Download multiman latest untuk ps3 dgn ftp client untuk pc.btw multiman version latest support ftp transfer
Multiman 4.02.00 base - http://www.sendspace.com/file/g8ri57
Filezilla client - http://filezilla-project.org/
Bila dah siap download,install filezilla kat pc mcm biase.install multiman (kalau belom ade multiman latest) kat ps3
-disconnect ps3 dari sebarang networking device
-plug ethernet cable ke ps3 ke pc,directly
-kat ps3,g ke internet setup,pilih wired connection lepastu ikot di bawah ni
10.1.1.1 for the IP address
255.255.255.0 for the subnet mask
10.1.1.1 for the default gateway
10.1.1.1 for the DNS
-then kat pc,g kat local area connection n ipv4.pilih properties n tukar ip kepada static.input :
10.1.1.2 for the IP address
255.255.255.0 for the subnet mask
10.1.1.1 for the default gateway
10.1.1.1 for the DNS
-launch multiman (make sure enable ftp in multiman setting)
-untuk filezilla punya configuration :
10.1.1.1 as the connection
Port 21
password - boleh letak apa2
username - FTPD12345
-klik connect
-done
--------------------------------------------------
Upload game ke int HDD PS3 (direct transfer)
-kat tab filezilla sebelah kiri,cari folder game untuk di-upload ke ps3.contoh 'c:\BLES10021'
-untuk ps3 tab di sebelah kanan (filezilla) pastikan korang bukak path '/dev_hdd0/game/GAMES'
-right klik pada game folder dalam pc ('c:\BLES10021'), pilih upload
-bile dah siap,refresh game list
Guide : Downgrade guide (e3)
Install e3 kat ps3.kalau ade alcohol cuci bahagian NOR clip dengan clip di TF board sebelum pasang
Siap pasang sume, boot ps3.kalau ps3 boleh boot means connection semua ok
Update e3 flasher ikot ape2 update
Switch backup mode,make dump from NOR chip
Cek dump
Kalau dump semua ok baru boleh downgrade. (e3_downgrade.bin)
Kalau downgrade ok ps3 sepatutnya boot ke connect controller screen
Jgn tekan ps button! pull out power cable.make sure takde power langsung kat ps3.
Connect downgrade dongle,power eject.
Do FSM step 1
Do FSM step 2
Pull out usb stick, boot ps3 ,mesti akan boot ke cfw .
Belum siap lg jgn nk hu ha hu ha dah siap downgrade. do dehashing after downgrade!
Run QA toggle
Install ofw 3.55 on recovery mode! --> for dehashing. kalau nk buat method reFSM,mesti install ofw 3.55 2 kali!
Install cfw on recovery mode.
Done
--------------------------------------------------
User experience with E3(problem mase downgrade)
Boot ps3,check lowest version yang boleh install, 2.70. then buat dump,redump,redump,redump .cek dump sume ok, then downgrade .
Bile nk trigger FSM, fail. sepatutnya lepas power eject tu konsol akan turn off. dan lampu kat dongle sepatutnye merah ke biru. tp still display connect controller screen :\
http://www.youtube.com/watch?v=FIlIABMC1lw
Kalut sgt smpai g format blk hdd kat pc. <-- too panic
Backup semuanya ok (good dump n safe to reflash). flash blk original dump (4.00) kat connect controller screen tu (tak perlu solder sbe tristate,sebab ps3 belum brick lg).
Pull out power cable,reconnect power cable. try boot ps3 but still ke connect controller screen <-- panic
Tekan ps button,try update (select + start ) kat ps3 ade usb dgn 4.11 pup. kuar prompt hdd akan di format. <-- means system successfully flashed back. system working now
Format hdd.amek masa jugak.then masuk recovery mode (update firmware) . mase update process smpai 40% kuar error. pelik. try 3 kali .fail jugak.
Then baru perasan BR drive tak connect. <-- missing/broken BR drive,takleh update firmware so kene ikot step ni utk bypass.tp untuk kes ni,tak perlu buat method ni.
Reconnect BR drive,update.update smpai 100%. automatic reboot.
Reboot ke 4.11
Then cuba lg downgrade.smpai part yg sama, tak boleh masuk FSM. ok skrg dah tau problem dgn dongle. kene cr dongle lain. so flash semula 4.00 backup
Certain downgrade dongle tak berkesan nk masuk FSM.kalau boleh sediakn dongle lain.boleh jugak guna psp JIG
Then cuba lg downgrade.smpai part yg sama, tak boleh masuk FSM. ok skrg dah tau problem dgn dongle. kene cr dongle lain. so flash semula 4.00 backup
Certain downgrade dongle tak berkesan nk masuk FSM.kalau boleh sediakn dongle lain.boleh jugak guna psp JIG
Tutorial : System Software Updates (Manual Update)
Required items
- PlayStation®3 system
- A wireless controller
- A USB cable
- A PC with Internet access
- Storage media (Memory Stick™, SD Memory Card, CompactFlash®)* or a USB Mass Storage device such as a USB flash drive(At least 168 MB of free space required)* An appropriate USB adaptor (not included) is required to use storage media with some models.
Update data download procedure
- Create a folder on the storage media in which to save the update data. Using a PC, create a folder named “PS3” on the storage media or USB device. Within the PS3 folder, create a folder named "UPDATE".
- Download the update data and save it in the "UPDATE" folder created in step 1.
- Location: Save in the “PS3” folder > “UPDATE” folder
- File name: Save as file name “PS3UPDAT.PUP”.
- Do not turn off the PS3™ system or remove the storage media or USB device during an update. If an update is cancelled before completion, the system software may become damaged, and the system may require servicing or exchange.
- During an update, the power button on the system front and PS button of the controller are inactive.
- Insert the storage media or USB device that contains the update data in the PS3™ system.
- From the home menu, select (Settings) > (System Update), and then press the button.
- Select [Update via Storage Media], and then press the button.
- Start the update.
- Confirm that the update was successful.
Notice
Be sure to save the update data as noted below. If the data is not saved in the correct way, the PS3™ system will not recognize the update data. The folder name must be in all uppercase letters.
Update procedure
Notice
The system automatically searches for and finds the update data saved on the storage media or USB device.
Press the button to start the update. Follow the on-screen instructions to complete the update.
After the update has been completed, go to (Settings) > (System Settings) > [System Information].
If the [System Software] field displays the version number of the update, the update was successful.
Hint
You can delete the update data from the storage media or USB device after the update has been successfully completed.
Tutorial : Access the PlayStation 3 Recovery Menu
How to Access Playstation Recovery Menu
1. Turn off Playstation®3.
2. Hold The power button down; The system will turn on and turn off once again.
3. Once the System has been shutdown, re-press you finger until you hear
2 consecutive beeps
4. When you hear the 2 beeps take finger off power button.
5. You will be promted to plug in your controller via usb and then hit the PS button
Tutorial : Swap FW update tanpa gunakan USB stick (CFW 3.55)
Biasenye nak install FW update dengan USB stick dengan PUP file via system update kat system setting atau recovery mode. Ni aku nk share care install FW update tanpe gunekan USB stick.--------------------------------------------------
Tools yang kene ade :
- Toggle QA dari Rebug team . download - http://www.mediafire.com/?mja7tmu7eshzefh
- PUP file [OFW3.55/CFW3.55 or ape2 PUP 3.55]
- Backup manager [multiMAN etc etc]
--------------------------------------------------
Enable “System Update Debug” :
- Download n install Toggle QA
- G kat menu network setting (jgn masuk network setting)
- Tekan L1,L2,L3,R1,R2,button bawah kat d-pad
- Debug setting akan keluar kalau korang buat combo betul tu dgn betul
- g kat “System Update Debug”, tukar ke enable/on
--------------------------------------------------
Transfer PUP file :
- Transfer PUP file ke dalam USB stick
- Bukak multiMAN,g kat file manager
- g kat dev_hdd0,buat 1 folder baru "updater"
- dalam folder "updater" td,buat 1 lg folder "01"
- Transfer PUP file tadi dalam folder "01" dan rename PUP tu ikot jenis PUP.kalau PUP tu kmeaw just rename Kmeaw.
- Ulang step dengan transfer PUP yang lain ke dalam folder baru "02" dan rename
- Terpulang la nak masukkan PUP ape dan make sure folder dalam PUP tu dalam turutan etc 01,02,03 dan 1 PUP untuk 1 folder.
Contoh struktur folder :
\update\01\3.55-PSN_MFW\update\02\3.55-OtherOSpp\update\03\3.55-TrueBlueV2
\update\04\3.55-Cobra
\update\05\3.55-Rebug
\update\06\3.50-MFW
\update\07\3.42-MFW
\update\08\3.41-MFW
\update\09\3.41-OtherOSpp
\update\10\3.40-MFW
\update\11\3.30-MFW
\update\12\3.21-MFW
\update\13\3.15-MFW
\update\14\3.10-MFW
\update\15\3.01-MFW
\update\16\3.00-MFW
\update\17\2.80-MFW
\update\18\2.76-MFW
\update\19\2.70-MFW
--------------------------------------------------
Reboot PS3,g kat system update dalam system setting,g kat update via harddisk akan ade senarai FW update. Dari situ boleh swap ke FW lain .

Tutorial : Blu-ray region unlocker
Blu-ray movie memang region-locked. Tak boleh play dengan blu-ray drive yang berlainan region. So dengan care ni boleh tukar blu-ray region dengan lv2 patcher.
--------------------------------------------------
Tools yang diperlukan :
- Kmeaw's lv2 patcher - http://www.mediafire.com/?8v5t4q3b774sxp8
- patch4.txt file - copy paste content patch ni (http://pastebin.com/Wc2JudNw) dalam notepad n rename ke "patch4.txt"
- patch5.txt file - copy paste content patch ni (http://pastebin.com/QkgM2r89) dalam notepad n rename ke "patch5.txt"
- patch6.txt file - copy paste content patch ni (http://pastebin.com/M6bknt4U) dalam notepad n rename ke "patch6.txt"
--------------------------------------------------
- Copy semua patch file tu (patch4.txt,patch5.txt,patch6.txt) ke /dev_hdd0/game/LV2000000/USRDIR
- Install dan run Kmeaw's lv2 patchers
- Ade 3 patch yang boleh dipilih (a,b,c)
- Bila dah pilih patch tak perlu reboot PS3. Kalau reboot PS3 , blu-ray region akan reset semula kepada yang asal.
Enjoy Movie
Tutorial : NTFS support for multiMAN
multiMAN boleh support NTFS partition/drive. TETAPI untuk transfer game dari external drive ke internal drive PS3 saje. Korang taleh main game dari NTFS partition/drive atau transfer file dari internal PS3 ke external PS3
Kelebihan features ni supaya korang boleh transfer game2 yang ade file >4gb tanpa split file tu dengan software. Korang gak boleh play ape2 media dari NTFS driver through multiMAN. Contohnya movie format (.mkv) korang boleh transfer/play direct dari NTFS driver.
--------------------------------------------------
Untuk enable multiMAN supaya support NTFS partition/drive, korang kene create config file yang contain NTFS driver identification.
-Gune software USBview
-Gune device manager untuk dapatkan driver ID - pergi ke Start button -> My Computer -> Properties -> Device manager -> Disk drive (pilih NTFS drive)-> Properties -> Details -> Parent
Langkah 1 - Download software USBview http://www.ftdichip.com/Support/Utilities/usbview.zip
Langkah 1 - Download software USBview http://www.ftdichip.com/Support/Utilities/usbview.zip
Langkah 2 - Connect NTFS partition/drive ke pc
Langkah 3 - Launch usbview
Langkah 4 - Pilih connected device dalam list, cari PID (Product ID) and VID (Vendor ID)
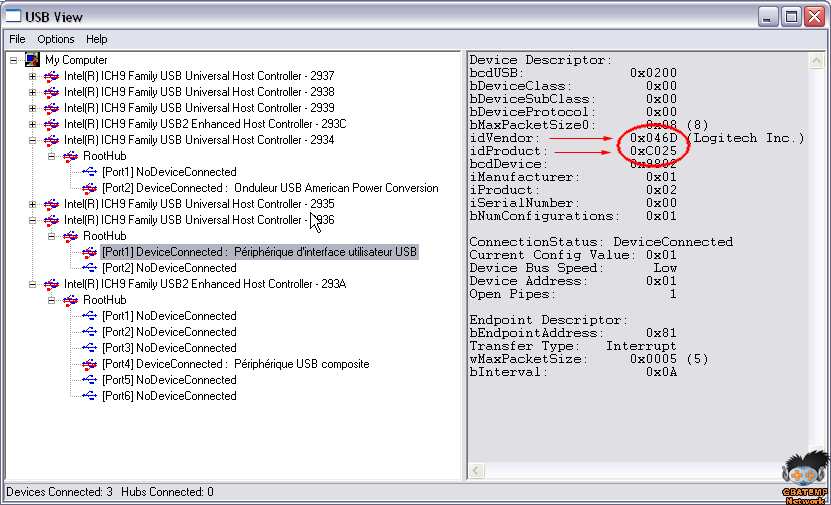
Langkah 5 - Buka USB.CFG dengan text editor (notepad). USB.CFG korang boleh dapatkan dalam archive multiMAN yang korang download. Dalam file ni ada contoh configuration (0x13fd:0x1240:1)
Langkah 6 - Ganti PID dan VID dengan korang punye drive ID
Formatnya seperti berikut :
VendorID:ProductID:Jumlah_partition dalam_drive
*HEX value mesti dalam lowercase :
0x046D:0xC025:1 = Salah
0x046d:0xc025:1 = Betul
Kalau drive korang ade 3 partition NTFS, so configuration akan jadi :
0x040d:0xc025:3 <---- jumlah partition
Langkah 7 - Save file ni dan transfer ke USB drive (fat32). Pastikan FAT32!
Langkah 8 - Launch multiMAN kat PS3 dan USB.cfg akan automatik copy ke dalam folder multiMAN
Langkah 9 - Connect NTFS partition/drive ke PS3
Siap
*Tak semua NTFS drive yang support dengan care ni. Kalau multiman freeze, mungkin driver tak support. Reboot PS3 dan cuba drive yang lain
Langkah 3 - Launch usbview
Langkah 4 - Pilih connected device dalam list, cari PID (Product ID) and VID (Vendor ID)
Langkah 5 - Buka USB.CFG dengan text editor (notepad). USB.CFG korang boleh dapatkan dalam archive multiMAN yang korang download. Dalam file ni ada contoh configuration (0x13fd:0x1240:1)
Langkah 6 - Ganti PID dan VID dengan korang punye drive ID
Formatnya seperti berikut :
VendorID:ProductID:Jumlah_partition dalam_drive
*HEX value mesti dalam lowercase :
0x046D:0xC025:1 = Salah
0x046d:0xc025:1 = Betul
Kalau drive korang ade 3 partition NTFS, so configuration akan jadi :
0x040d:0xc025:3 <---- jumlah partition
Langkah 7 - Save file ni dan transfer ke USB drive (fat32). Pastikan FAT32!
Langkah 8 - Launch multiMAN kat PS3 dan USB.cfg akan automatik copy ke dalam folder multiMAN
Langkah 9 - Connect NTFS partition/drive ke PS3
Siap
*Tak semua NTFS drive yang support dengan care ni. Kalau multiman freeze, mungkin driver tak support. Reboot PS3 dan cuba drive yang lain
Tutorial : BDB patched firmware
Untuk user yang ade masalah br drive, update firmware takkan jadi kalau br drive ade masalah ( rosak,patah,masalah kat logic board etc ) . user tersebut kene bypass firmware check semase firmware update.
so untuk bypass bluray drive (BDB) mase update , firmware update tu kene patch supaya dapat bypass bluray drive. ekceli, bukan la kite patched firmware update tu, tp beberape XML line yg ade maklumat bluray dlm firmware tu akan die buang.
-------------------------------------------------------
1 - download BDB package - http://www.sendspace.com/file/py3opn
2 - download 7z, install dalam pc
3 - extract BDB package ke drive C: . rename folder ke "HOME"
4 - klik start button dan taip "CMD" . launch CMD as admin dan taip "cd C:\HOME"
5 - copy firmware yang akan di-patch ke C:\PS3 (folder yg same)
6 - right click pada my computer -> properties -> advanced tab - environment variables. tambah system variable baru ; variable name = HOME , variable value = C:\PS3
7 - dalam CMD, taip "pupunpack PS3UPDAT.PUP FOLDER_BARU" . nama folder depend pada user tp dalam tutorial ni gunakan PS3 [ langkah 3 ]
8 - masuk ke dalam folder yg dah di-encrypt (FOLDER_BARU)
9 - extract file “update_files.tar” menggunakan 7z dengan option ke-3 (“Extract to “update_files”)
10 - masuk ke dalam folder yg dah di-extract dan cari file "UPL.xml.pkg" . cut file ni dan paste pada root folder PS3 (langkah 3)
11 - dalam CMD taip “fwpkg d UPL.xml.pkg UPL” untuk buat 3 fail ni (UPL.0, UPL.1, UPL.2)
12 - buka fail UPL.2 dengan text-editor dan remove line ni 119 hingga 152 :
<Package>
<Type>BdpRevoke</Type> <FileName>dev_flash3_022.tar.aa.2010_07_29_170122</FileName>
</Package>
<Package>
<Type>BD</Type>
<FileName>BDIT_FIRMWARE_PACKAGE.pkg</FileName>
</Package>
<Package><Type>BD
</Type><FileName>BDPT_FIRMWARE_PACKAGE_301R.pkg</FileName>
</Package>
<Package><Type>BD
</Type><FileName>BDPT_FIRMWARE_PACKAGE_302R.pkg</FileName>
</Package>
<Package><Type>BD</Type> <FileName>BDPT_FIRMWARE_PACKAGE_303R.pkg</FileName>
</Package>
<Package><Type>BD</Type> <FileName>BDPT_FIRMWARE_PACKAGE_304R.pkg</FileName>
</Package>
<Package><Type>BD</Type> <FileName>BDPT_FIRMWARE_PACKAGE_306R.pkg</FileName>
</Package>
<Package><Type>BD</Type> <FileName>BDPT_FIRMWARE_PACKAGE_308R.pkg</FileName>
</Package>
13 - simpan dan tutup fail UPL.2 dan buang file "UPL.xml.pkg"
14 - dalam CMD taip "fwpkg e UPL.xml.pkg UPL.0 UPL.1 UPL.2"
15 - sekarang "UPL pkg" dah di-encrypt semula. letak semula fail "UPL pkg" dalam folder "update_files" (dalam FOLDER_BARU)
16 - right click pada "update_files" dan klik 7z , add to archieve tukar format archieve dari .7z ke .tar
17 - selepas compress fail tu, cut fail "update_files" yg dah di-compress dan paste ke root folder PS3
18 - dalam CMD taip “fix_tar update_files.tar”
19 - sekarang cut file yg dah di-fix ke dalam folder FOLDER_BARU semula
20 - pastikan file2 dalam FOLDER_BARU ade :
dots.txt
license.txt
ps3swu.self
update_files.tar
update_flags.txt
vsh.tar version.txt
21 - dalam CMD taip “puppack BDBPatchedPS3UPDAT.PUP FOLDER_BARU”
22 - firmware dah completely patched.
23 - install patched firmware ni via recovery mode
24 - sekrang boleh update firmware dengan bypass bluray drive check :)
----------------------------------------------------
personally, PS3 useless kalau bluray drive rosak. tak boleh tukar bluray drive dengan yg lain suka2 hati. kalau nk buat mcmtu kene buat remarry process yg cume boleh buat dalam CFW.
PS3 with broken br drive + update latest firmware = useless
PS3 with broken br drive + stay on CFW = pretty useless too :P
solution untuk PS3 CFW 3.55 yang ade br drive rosak ; do marry! tu pon kalau ade br drive extra compitable ikot model fat or slim
solution untuk PS3 OFW 3.60+ yang br drive rosak ; update latest firmware, downgrade ke 3.55 (downgrade process boleh tanpa br drive). kat CFW 3.55,do remarry br drive.
Tutorial : Xlink Kai
First,setup network. Ape yg diperlukn ade ialah konsol PS3 dan PC yang run dari router yang same,sama ada wired ataupun wireless
langkah 1 : Download Xlink Kai dari official site XLINK KAI = http://www.teamxlink.co.uk/
langkah 2 : stay kat page xlink kai,register akaun baru.
langkah 3 : Install Xlink Kai kat PC
langkah 4 : launch
langkah 5 : right klik kat small Kai ikon(bottom right corner of your screen ) dan klik configure Kai.new internet windows will appear
skrol sampai bawah untuk network setting.ikut nilai kat bawah :
Port : 30000
Deep port : 0
Web UI port : 34522
*Ikot screenshot bawah

langkah 6 : Port forwarding, part paling bnyak org buat silap - http://www.simpleportforwarding.com/
langkah 7 : download and install. Siap install run program.sekarang,pergi ke “please choose a router” dan pilih model router yang sedang digunakn .masukkan username and password kalau ade. nak senang,tengok kat bawah router atau kat mane2 part kat router dan cari model number.
langkah 8 : pergi ke “file -> add port -> add custom”.ikot nilai kat bawah :
name : boleh letak nama apa2
type : TCP/UDP
Start port : 30000
End port : 34522
I.P address : ( default)
dah siap,klik “add”
langkah 9 : port yang dah create akan ada dalam list.sekarang pergi ke bottom program tu dan klik “update router”.ia akan launch small browser and routers login page.kalau program tu tak automatic sign in, just masukkan username dan password.perhatikan program tu dan pastikan ia set kepada port yang betul !
langkah 10 : next,turn on PS3,pergi ke network setting,configure semua setting ke default (wired or wireless connection).restart PS3
langkah 11 : launch Kai engine dan UI.
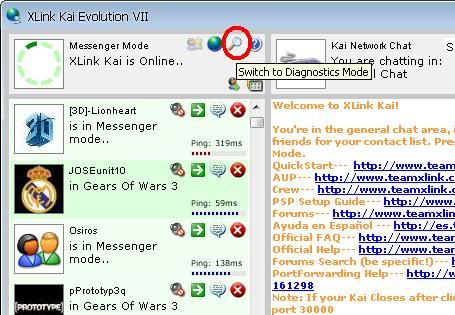
klik kat ikon tersebut.lepastu klik magnifying glass mcm dlm screenshot kat atas. akan ade ikon kecik bawah ikon2 yang lain ”No console detected”. this is ok!
langkah 12 : boot PS3.and boot game COD black ops.bile dah launch game,pergi ke zombie/local multiplayer -> LAN games,search for a game.
Sekarang kat list yang stated “no console detected” should now say ”PS2/PS3 Configured successfully”
Langkah 13 : klik kat globe next to magnifying glass
klik green arrow on ps3 klik green arrow on FPS klik green arrow on black ops klik green arrow on europe klik green arrow on france ( sini ade bnyak player biasenye )
langkah 14 : kat PS3,search game and boleh nampak ade beberape games show up.kalau nak main dengan kawan2 dalam malaysia ajak la dorang wat step ni and pilih server dari france yang same.
Profit :)
--------------------------------------------------
Here is a list of PlayStation 3 Games (with a lan option) that work with XLink Kai:
Blazing Angels 2 Multiplayer Demo
Call of Duty 4
F.E.A.R
The Darkness
Warhawk
Ghost Recon Advanced Warfighter 2
Kane & Lynch Dead Man
Borderlands
Call of Duty 4
Call of Duty Modern Warfare 2
Call of Duty W at W
Condemned 2
F.E.A.R
Haze
OFP Dragon Rising
Rainbow Six Vegas
TimeShift
Unreal Tournament 3
Armored Core 4
Blazing Angels 2
Blur
DiRT
DiRT 2
F1 2010
Formula 1 Championship
H.A.W.X 2
Dark Sector
Red Dead Redemption
Red Fraction Guerrilla
Saints Row 2
Tutorial : Upgrade HDD

perkare penting bila pilih HDD baru ialah :
- HDD PS3 gunakan 2.5” SATA HDD (notebook HDD).
- elok kalau pilih 5400 rpm memandangkan 7200 rpm akan hasilkan lebih haba.ade pendapat lain yg kate 7200 rpm tak efek apa2 pada PS3
- saiz kapasiti ikot user la.tapi max kapasiti untuk internal hdd ps3 ialah 1tb
**tutorial ni untuk fat ps3 tp tak bnyak beze dengan slim ps3
Sebelum upgrade HDD,pastikan backup semua data dalam HDD PS3 ke external storage (FAT32).buat full backup untuk backup semua data.

Untuk trofi,sistem backup tak termasuk trofi.means,boleh backup semua data kecuali trofi.untuk pengguna retail PS3 (unmodded),1 cara untuk simpan trofi ni dengan synchronize ke PSN.
Cara synchronize trofi ke PSN :
- buat 1 akaun PSN.kalau dah ade boleh skip
- kat XMB™ menu,pergi ke bahagian trofi.tekan triangle button ,sync trofi ke PSN
selesai semua step,sekarang boleh swap/upgrade HDD.ape yg diperlukan ialah Phillips-head screwdriver.

Turn off dan cabut power cable dari PS3.cabut plastic HD side-panel dan buka skru warna biru.

Buka metal latch,gerakkan drive tray ke kanan dan tarik keluar.

Buka 4 skru yang hold HDD ke drive tray

Swap dengan HDD baru,skru semula pada drive tray

Masukkan semula drive tray ke dalam tempat asal dan skru

hidupkn semula system.prompt akan keluar untuk format HDD baru. selesai format,pergi ke PS3 backup utility dan restore semula data dari external storage ke HDD PS3
So... We're up!
1st post! Aku and team aku buat blog ni khas untuk rujukan pengguna PS3 CFW 3.55. Dalam blog ni kitorang cuba share ilmu2 berkaitan PS3 hacking/modding dan tutorial. Sedikit info, aku owner grup page hacking/modding PS3 kat facebook (http://www.facebook.com/groups/346316005404229/)
Enjoy :)
Subscribe to:
Posts (Atom)